Operation manual for singularization of oblique photogrammetric model and attribute query
Overview
The oblique photogrammetric model is usually called a "skin" model. In order to exert the application value of the oblique photography model, the oblique photography model must be singulated. SuperMap 3D GIS takes the lead in singulating the oblique photography model by superimposing the vector plane on the model. This method is simple to operate, and stores various business attribute information in the attribute table of the vector plane data to achieve singulation at the same time Ability to perform attribute query on oblique photography model.
Currently, SuperMap iClient3D for WebGL provides many demonstration programs, among which the "oblique photography attribute query" example demonstrates the effect of single selection and attribute query of the oblique photography model.
This document will guide users how to use their own oblique photography model to implement attribute query on the WebGL client according to the effect of the example. The main flow of this operation is as follows:
Operation process
1. Data preparation
Required data include:
(1)Oblique photogrammetric model data: For example, the oblique photogrammetric model and configuration file (*.scp) in *.osgb format. If there is no configuration file, please refer to the "Operation Manual for Loading Tilt Photography Model" The first step is to generate the SCP configuration file.
(2)Two-dimensional vector surface data: The position of the vector surface data is matched with the oblique photography model, and the attribute table of the vector surface data is improved; the vector surface data is stored in the file data source (*.udb).
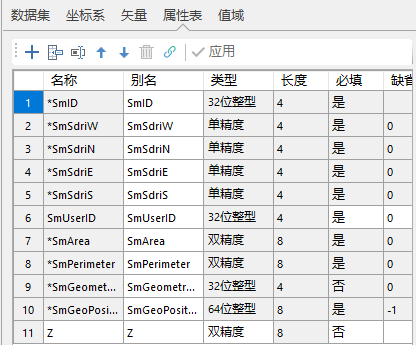
Figure 1: Attribute structure of vector surface attribute table
Select the data set in the "Workspace Manager" and open its attribute table, and In the Ribbon "Property Sheet", view and modify the attribute structure of the data, and please add attribute fields and improve attribute values for vector data according to business needs.
2. Publish 3D service and data service
Instruction
In this step, the oblique photographic model in S3M format is published to a local or remote server in the form of a three-dimensional service to realize Web network resource sharing. In order to realize attribute query, a data service will also be published.
Steps
(1). In the "Workspace Manager" of the SuperMap iDesktop desktop product, right-click "Open File Datasource" at the "Datasource" to open the Datasource with the vector surface data ( *.udb);
(2). Create a new spherical scene, select "Common layer" under "Layer Manager", right-click "Add OSGB cache Layer", select the *.scp configuration file generated by the "Generate S3M Data" operation.
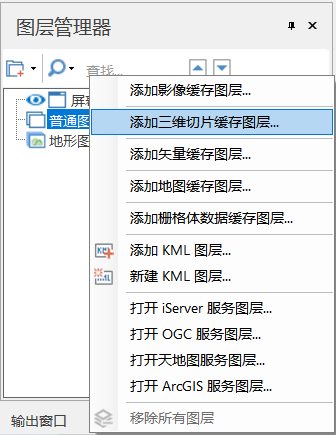
Figure 2: Add OSGB cache to the scene
(3). After loading the data, locate the layer and set a suitable observation angle, save the scene and workspace; after saving, close the current workspace, which may cause subsequent service release failure.
(4). Start the SuperMap iServer service: In the %SuperMap iServer_HOME%/bin directory, click the "startup.bat" batch file to start the service.
(5). Open the browser, enter http://localhost:8090/iserver/manager in the address bar and enter "< Strong>Service Management" page, click the "Quickly publish a service or a group of services" button under "Home".
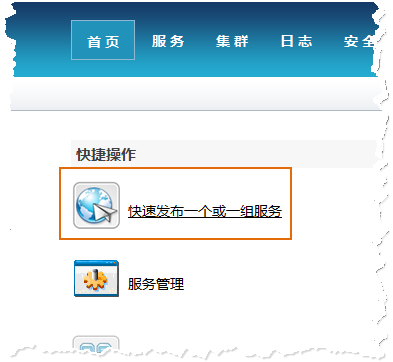
Figure 3: Quickly publish a service or a group of services
(6). The "Quick Publish Service-Select Datasource" dialog box pops up, select "Datasource" "Workspace", click "Next".
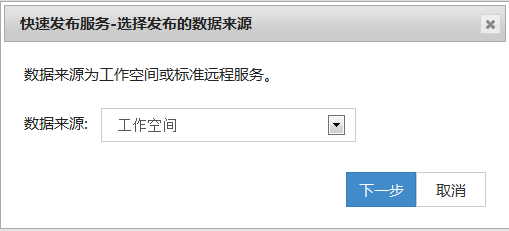
Figure 4: Datasource selection workspace
(7). The "Quick Publish Service-Configuration Data" dialog box pops up, click "Remote Browse" button to select the previously saved workspace, click "Next".
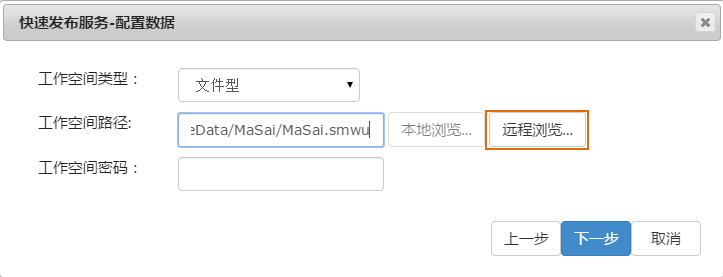
Figure 5: Select workspace configuration data
(8). The "Quick Publish Service-Select Service Type to Publish" dialog box pops up, check "REST-Data Service" and "REST -3D service", click "Next".
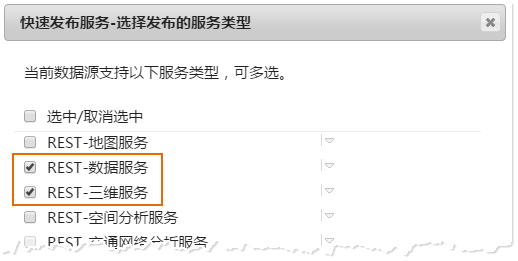
Figure 6: Check 3D service and data service
At this point, the service publishing has been configured. Follow the prompts to click the "Finish" and "Close" buttons.
3. Client browser and attribute query
Result of the operation
(1)Please store the for WebGL product package in the SuperMap iServer/webapps directory before operation.
(2)Enter the storage path of the for WebGL product package SuperMap iServer/webapps, under the "examples/webgl" folder, open the "dynamicDTH.html" example in text mode, and modify the content as shown below.
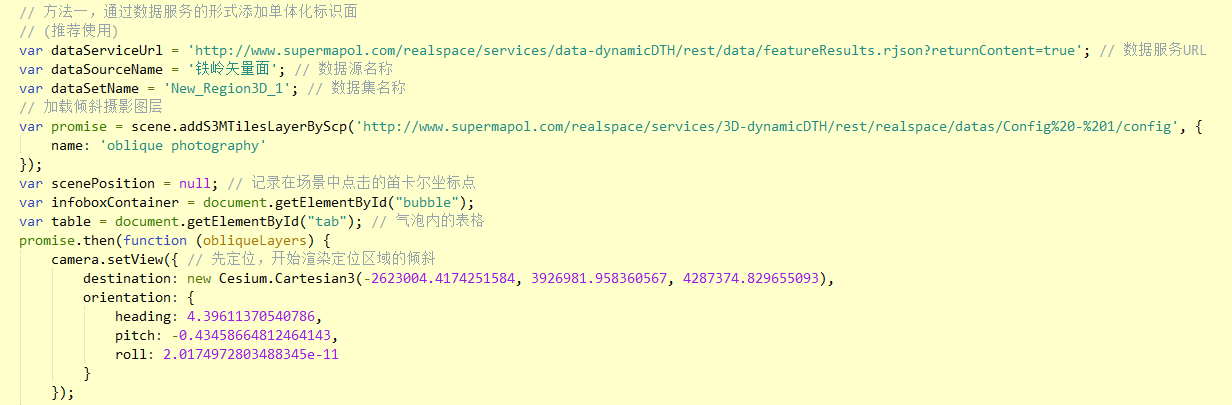
Figure 7: Modify some parameters of the example
- ①Modify the oblique photographic layer address scene. addS3MTilesLayerByScp ()function: modify the address to the just copiedurladdress,and Change the name.
- ②Modify the oblique photographic server address dataServiceUrl and dataSourceName as the name of dataSource、dataSetName as the name of vector face dataset.
- ③ModifySuperMap3D.Cartesian3() as scp file's insertion point coordinates, for in-flight orientation to oblique camera model positions
(3) Set the attribute query parameter in the "dynamicDTH.html" example, that is, modify the layer.setQueryParameter() part, as shown below:

Figure 8: Modify the query parameters of the example attributes
- ①Among them, url is the address of the data service, paste the url address of the "root node of data service (data)" page;
- ②dataSourceName is the name of the Datasource;
- ③dataSetName is the name of the vector face dataset;
- ④keyWord is the query keyword, which can be set as the "SmID" field.
(5) After modifying the example, open the "dynamicDTH.html" webpage in localhost
Result of the operation
After opening the webpage, the camera flies to the position of the tilted photographic model, click on any model, the model will be highlighted and a pop-up window will display its properties. The effect is as shown below:

Figure 9: Attribute query effect diagram on oblique photography model