Set thematic map operation manual according to field Value
Overview
A point plug-in model refers to a model that has the same material, shape and size, but differs in spatial location and posture. Only one model is used, and the position information is stored in a three-dimensional point dataset to store multiple model datasets. Collectively. This method has similarities with instantiation, and can reduce space occupation and data volume. SuperMap GIS series products support the generation and processing of point plug-in models. In order to optimize the display effect of the point plug-in model when selected, and to improve the browser rendering efficiency of the selected point plug-in model, SuperMap iClient3D for WebGL (hereinafter referred to as WebGL client) supports the selection of sub-objects of the plug-in model. When the sub-objects of the model are selected on the WebGL client, only the selected part is highlighted.
This article explains in more detail the detailed process of loading, browsing and sub-object selection of the plug-in model on the WebGL client. The main process includes:
Operation flow
This article takes the railway track model data as an example for detailed operation demonstration.
1. Point plug-in model cache generation
Steps
(1). In the workspace manager of the SuperMap iDesktop desktop product, open the data source that needs to generate the cache model.
(2). In the "Generate Cache" group of the "3D Data" tab, Select "Point set to generate cache plug-in model".

Figure 1: Schematic diagram of the functional location of "Point Set Generation Cache Plug-in Model"
(3). The "Point plug-in model generation cache" dialog box pops up (as shown in Figure 2), click the "Add Dataset" button in the first row , Select the data set to be cached.
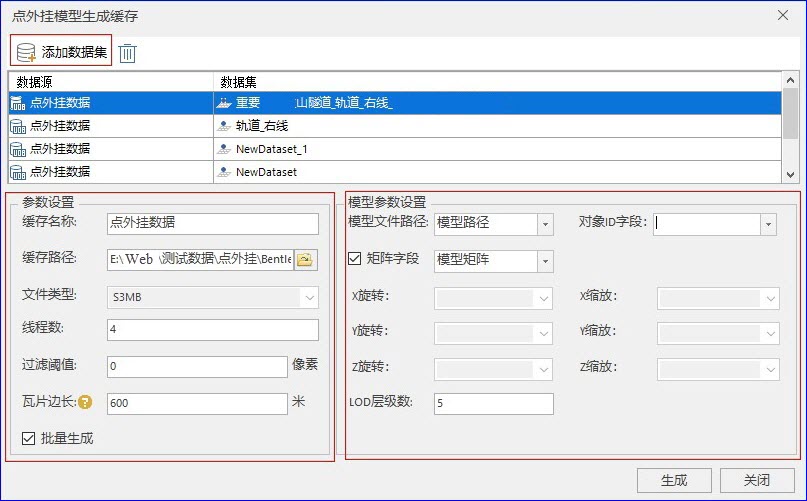
Figure 2: "Creating Cache for Point-to-plug Model" dialog box
(4). Set the parameters, as shown in the red frame at the bottom left of Figure 2:
- Cache name: Set the name of the generated point plug-in model cache;
- Cache path: Set the storage path of the model cache;
- File type: The new version of SuperMap iDesktop desktop products only support generating S3MB format cache;
- Number of threads: The default is 4;
- Filtering threshold: Set the parameters for filtering sub-objects of the rough layer, in pixels. If set to 2, it means that sub-objects smaller than 2 pixels will be filtered out, the default is 0, that is, no filtering;
- Tiles side length: Display and set the side length of tiles, unit: meter. The different side lengths of the tiles correspond to the different scales, Move the mouse to the question mark behind the label to view the corresponding relationship between the side length of the tile and the scale and level;
- Batch generation: Set whether to cache in batches. If checked, generate in batches, that is, multiple data sets will generate a cache file;
(5). Set the model parameters, as shown in the red frame at the bottom right of Figure 2:
- Model file path: Specify the field as the model file path, the path here is an absolute path;
- Object ID field: Set a field that uniquely identifies ID;
- Matrix field: When checked, select the data field as the rotation and zoom parameter. When unchecked, the user can customize the X/Y/Z rotation and scaling parameters;
- LOD levels: Set the number of cached LOD levels.
(6). Click the "Generate" button to generate a plug-in model cache.
Result of the operation
After the generation is complete, the cache file can be seen under the set cache path, as shown in Figure 3.
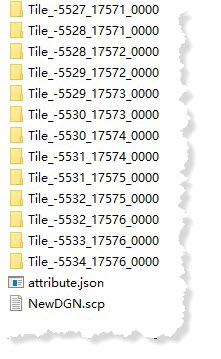
Figure 3: Point set generation plug-in model cache result
2. Publishing of 3D service
Operation instructions
Add the plug-in model cache generated in the previous step to the desktop and save it as a workspace, and publish it as a service on SuperMap iServer.
Operation steps
For the specific operation process, please refer to Operation Manual for Loading Oblique Photography Model Step 3: "Publish 3D service"
3. WebGL client browsing and sub-object selection
Steps
(1). After publishing the 3D service, enter the service's "Root Directory" page, click "realspace", and copy the url in the browser address bar Address. For detailed operation procedures, please refer to Loading Oblique Photography Model Operation Manual.
(2). Modify the relevant parameters of the example "S3MTiles_srsb_water.html" under the "examples" folder of the WebGL product package
var promise = scene.open("http://localhost:8090/iserver/services/3D-DianWaiGua/rest/realspace");
Or create a new .html sample file and open the service scene through the scene.open(url) method:
var promise = scene.open(url);
At this time, click on the point plug-in model in the scene and find that the sub-objects of the model cannot be selected, as shown in Figure 5:
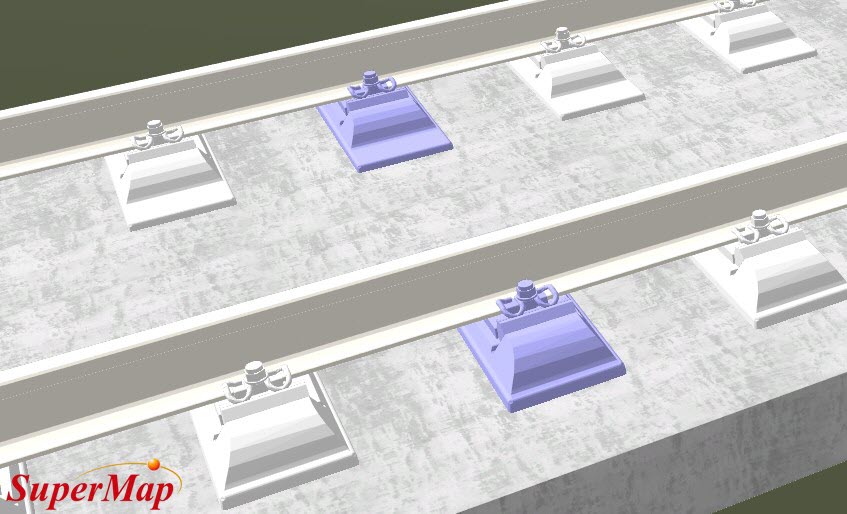
Figure 5: Click the plug-in model selection effect diagram
(3). This is because the selection of sub-objects in the layer is set to off. Through the following sentence, find the point plug-in layer of the model and set its sub-objects as selectable:
				Supermap3D.when(promise, function(layers){
				var skeleton = scene.layers.find ("NewDGN"); //Layer name can be viewed in desktop software or published service
				skeleton.skeletonSelectEnable = true
				});
At this time, click on the model again, its sub-objects are in a selectable state, and the display effect is shown in the figure below:
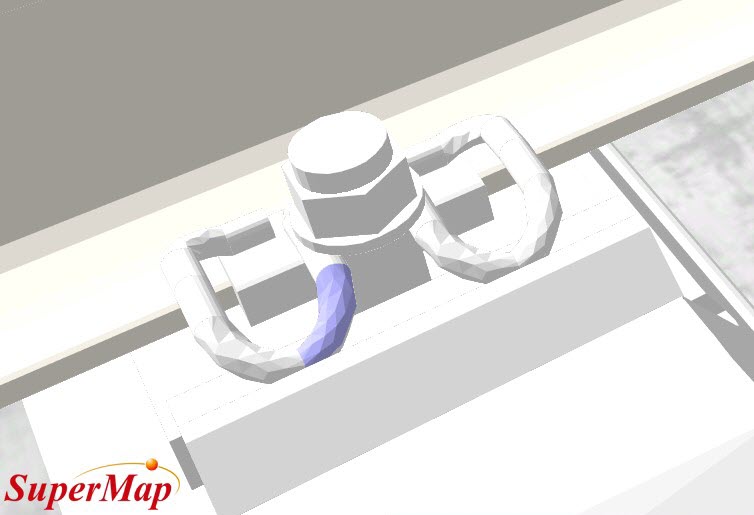
Figure 6: Click on the effect of selecting the sub-objects of the plug-in model